This section describes the Adjustment Types supported in the Cost Adjustments Integrator.
Reverse
To reverse existing Project Costs, please follow the instructions below:
1. Download Project Costs using the Cost Adjustments Integrator. In the example below, the projects costs are downloaded using the Expenditure Batch criteria.
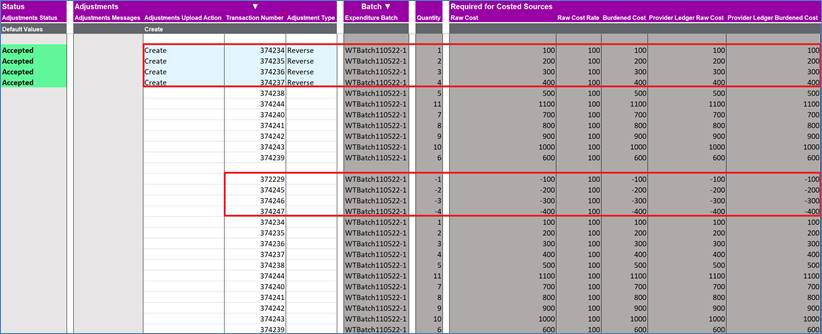
2. Once the Project Costs that are to be reversed have been identified, use the Adjustments section to enter Adjustments Upload Action of ‘Create’ or utilize the Default Row so that the Upload Action is applied to the rows below. Enter Adjustment Type of ‘Reverse’ on the same line as the Project Cost you want to reverse. Transaction Number must exist for the cost in order for the reversal to work. You may want to delete the read-only columns that you do not need from the sheet.
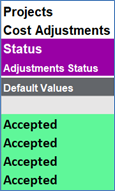
3. Once the reversals have been entered, they can be uploaded to Oracle. More information on how to upload records to Oracle can be found at Uploading. Clicking on the ‘Upload’ will trigger the Integrator validation as well as the Oracle REST Web Service validation. Once the reversals pass validation, they will be uploaded to Oracle. See section Error Handling and Validation for more information about validation. A successful upload of reversals will be returned with the status of ‘Accepted’ in the Adjustments Status column.
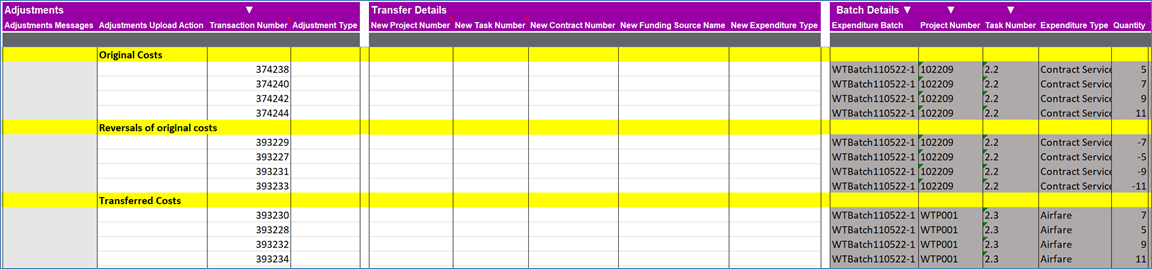
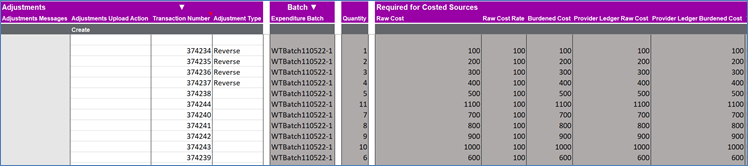
4. You can download the batch again to review the reversing transactions. In the example below, a reversal was created for the four existing project costs in a batch. When the batch is downloaded again on the sheet, four new reversing transactions are downloaded as part of the same batch.
Set to Capitalizable
To carry out the Adjustment Type ‘Set to capitalizable’ for existing Project Costs, please follow the instructions below.
1. Download Project Costs using the Cost Adjustments Integrator. In the example below, the projects costs are downloaded using the Expenditure Batch criteria.
2. Once the Project Costs that are to be reversed have been identified, use the Adjustments section to enter Adjustments Upload Action of ‘Create’ or utilize the Default Row so that the Upload Action is applied to the rows below. Enter Adjustment Type of ‘Set to capitalizable’ on the same line as the Project Cost you want to reverse. Transaction Number must exist for the cost in order for the reversal to work. You may want to delete the read-only columns that you do not need from the sheet.

3. Once the Adjustments have been entered, they can be uploaded to Oracle. More information on how to upload records to Oracle can be found at Uploading. Clicking on the ‘Upload’ will trigger the Integrator validation as well as the Oracle REST Web Service validation. Once the Adjustments pass validation, they will be uploaded to Oracle. See section Error Handling and Validation for more information about validation. A successful upload of Adjustments will be returned with the status of ‘Accepted’ in the Adjustments Status column.
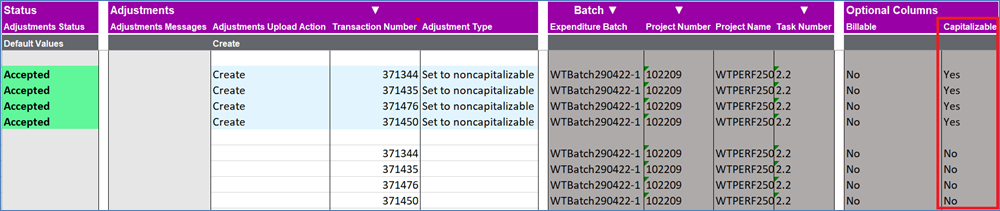
4. You can download the transactions to review the adjustments done. In the example below, a ‘Set to capitalizable’ Adjustment Type was used to change the Capitalizable flag on existing project costs. When the transactions are downloaded again on the sheet, they show that the Capitalizable flag has been adjusted successfully.
Set to Noncapitalizable
To carry out the Adjustment Type ‘Set to noncapitalizable’ for existing Project Costs, please follow the instructions below.
1. Download Project Costs using the Cost Adjustments Integrator. In the example below, the projects costs are downloaded using the Expenditure Batch criteria.
2. Once the Project Costs that are to be reversed have been identified, use the Adjustments section to enter Adjustments Upload Action of ‘Create’ or utilize the Default Row so that the Upload Action is applied to the rows below. Enter Adjustment Type of ‘Set to noncapitalizable’ on the same line as the Project Cost you want to reverse. Transaction Number must exist for the cost in order for the reversal to work. You may want to delete the read-only columns that you do not need from the sheet.
3. Once the Adjustments have been entered, they can be uploaded to Oracle. More information on how to upload records to Oracle can be found at Uploading. Clicking on the ‘Upload’ will trigger the Integrator validation as well as the Oracle REST Web Service validation. Once the Adjustments pass validation, they will be uploaded to Oracle. See section Error Handling and Validation for more information about validation. A successful upload of Adjustments will be returned with the status of ‘Accepted’ in the Adjustments Status column.
4. You can download the transactions to review the adjustments done. In the example below, a ‘Set to noncapitalizable’ Adjustment Type was used to change the Capitalizable flag on existing project costs. When the transactions are downloaded again on the sheet, they show that the Capitalizable flag has been adjusted successfully.
Set to Billable
1. Download Project Costs using the Cost Adjustments Integrator. In the example below, the projects costs are downloaded using the Expenditure Batch criteria.
2. Once the Project Costs that are to be reversed have been identified, use the Adjustments section to enter Adjustments Upload Action of ‘Create’ or utilize the Default Row so that the Upload Action is applied to the rows below. Enter Adjustment Type of ‘Set to billable’ on the same line as the Project Cost you want to reverse. Transaction Number must exist for the cost in order for the reversal to work. You may want to delete the read-only columns that you do not need from the sheet.

3. Once the Adjustments have been entered, they can be uploaded to Oracle. More information on how to upload records to Oracle can be found at Uploading. Clicking on the ‘Upload’ will trigger the Integrator validation as well as the Oracle REST Web Service validation. Once the Adjustments pass validation, they will be uploaded to Oracle. See section Error Handling and Validation for more information about validation. A successful upload of Adjustments will be returned with the status of ‘Accepted’ in the Adjustments Status column.
4. You can download the transactions to review the adjustments done. In the example below, a ‘Set to billable’ Adjustment Type was used to change the Billable flag on existing project costs. When the transactions are downloaded again on the sheet, they show that the Capitalizable flag has been adjusted successfully.
Set to Nonbillable
1. Download Project Costs using the Cost Adjustments Integrator. In the example below, the projects costs are downloaded using the Expenditure Batch criteria.
2. Once the Project Costs that are to be reversed have been identified, use the Adjustments section to enter Adjustments Upload Action of ‘Create’ or utilize the Default Row so that the Upload Action is applied to the rows below. Enter Adjustment Type of ‘Set to nonbillable’ on the same line as the Project Cost you want to reverse. Transaction Number must exist for the cost in order for the reversal to work. You may want to delete the read-only columns that you do not need from the sheet.

3. Once the Adjustments have been entered, they can be uploaded to Oracle. More information on how to upload records to Oracle can be found at Uploading. Clicking on the ‘Upload’ will trigger the Integrator validation as well as the Oracle REST Web Service validation. Once the Adjustments pass validation, they will be uploaded to Oracle. See section Error Handling and Validation for more information about validation. A successful upload of Adjustments will be returned with the status of ‘Accepted’ in the Adjustments Status column.
4. You can download the transactions to review the adjustments done. In the example below, a ‘Set to nonbillable’ Adjustment Type was used to change the Billable flag on existing project costs. When the transactions are downloaded again on the sheet, they show that the Capitalizable flag has been adjusted successfully.
Transfer
To transfer existing Project Costs, please follow the instructions below:
1. Download Project Costs using the Cost Adjustments Integrator. In the example below, the projects costs are downloaded using the Expenditure Batch criteria.
2. Once the Project Costs that are to be transferred have been identified, use the Adjustments section to enter Adjustments Upload Action of ‘Create’ or utilize the Default Row so that the Upload Action is applied to the rows below. Enter Adjustment Type of ‘Transfer’ on the same line as the Project Cost you want to transfer. Transaction Number must exist for the cost in order for the transfer to work. You may want to delete the read-only columns that you do not need from the sheet.
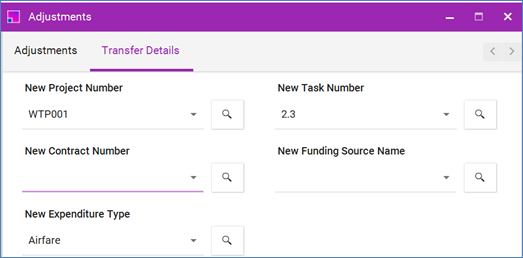
Transfer Details must be completed if the Adjustment Type ‘Transfer’ is to be used. Data Form can be used to enter Transfer Details:
Transfers can be made to new:
a. Project Number
b. Task Number (required when Project Number is provided)
c. Contract Number (required if Project Number is associated with a Contract)
d. Funding Source (required if Contract Number is provided)
e. Expenditure Type
You do NOT need to enter items a, b, c and d if you are only transferring the Expenditure Type.
3. Once the transfers have been entered, they can be uploaded to Oracle. More information on how to upload records to Oracle can be found at Uploading. Clicking on the ‘Upload’ will trigger the Integrator validation as well as the Oracle REST Web Service validation. Once the transfers pass validation, they will be uploaded to Oracle. See section Error Handling and Validation for more information about validation. A successful upload of transfers will be returned with the status of ‘Accepted’ in the Adjustments Status column.
4. You can download the batch again to review the transferred transactions. In the example below, a transfer was created for the four existing project costs in a batch. Reversing transactions are also created. When the batch is downloaded again on the sheet, eight new transactions are downloaded as part of the same batch showing the transferred and reversed costs.
Split
To Split existing Project Costs, please follow the instructions below:
1. Download Project Costs using the Cost Adjustments Integrator. In the example below, the projects costs are downloaded using the Expenditure Batch criteria.
2. Once the Project Costs that are to be Split have been identified, use the Adjustments section to enter Adjustments Upload Action of ‘Create’ or utilize the Default Row so that the Upload Action is applied to the rows below. Enter Adjustment Type of ‘Split’ on the same line as the Project Cost you want to split. Transaction Number must exist for the cost for the transfer to work. You may want to delete the read-only columns that you do not need from the sheet.
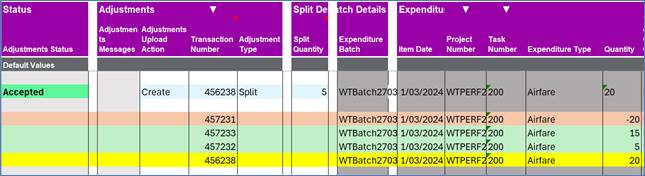
3. To initiate the split and upload process, enter the desired 'Split Quantity'. The following example illustrates the outcome of a transaction undergoing the split procedure:
a. The row highlighted in yellow represents the original transaction.
b. The row highlighted in red signifies the reversal of that line during adjustments.
c. Rows highlighted in green depict the new transactions resulting from the split. With a 'Split Quantity' of 5 utilized to divide the original transaction's quantity of 20, two new transactions are created: one with a quantity of 5, and another with the remaining quantity of 15.
Invoice and Revenue Hold Adjustment Types
To adjust invoice and revenue statuses for existing Project Costs, please follow the instructions below:
1. Download Project Costs using the Cost Adjustments Integrator. In the example below, the projects costs are downloaded using the Expenditure Batch criteria.
2. The following Adjustment Types can be used to adjust invoice and revenue hold statuses:
a. Hold Invoice Once
b. Hold Invoice Until Released
c. Release Invoice Hold
d. Hold Revenue Until Released
e. Release Revenue Hold
3. Once the Adjustments have been entered, they can be uploaded to Oracle. More information on how to upload records to Oracle can be found at Uploading. Clicking on the ‘Upload’ will trigger the Integrator validation as well as the Oracle REST Web Service validation. Once the Adjustments pass validation, they will be uploaded to Oracle. See section Error Handling and Validation for more information about validation. A successful upload of Adjustments will be returned with the status of ‘Accepted’ in the Adjustments Status column.
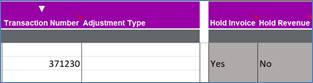
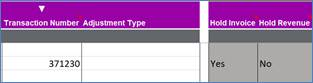
4. You can download the transactions to review the adjustments done. In the example below, a ‘Hold invoice once’ Adjustment Type was used to change the Hold Invoice status on existing project cost.
Sections: