ERP Cloud Toolbox Add-in User Guide

×
Menu
  • Scheduled Processing

Scheduled Processing

 
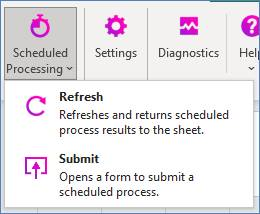
Integrators that use schedule processing will have the ability to submit and return the output from their respective scheduled process to the sheet.
 
 
When using an integrator with this functionality, the Upload process will attempt to load the data to the cloud interface, ready for processing.
 
Refreshing
 
Follow the steps below to process your records:
 
1.    When all data is prepared for upload, follow the standard Upload process to load your data into Oracle Cloud.   If any records error, ensure to fix then re-attempt the upload.
2.    Following the step 1 process, all successful records will be flagged with a status of  along with an identifier value populated in a pre-defined column for that integrator. See below for an example:
          
The Transaction Reference ID column has been populated after the upload process was run.
 
3.    Navigate to the Oracle Cloud User Interface and manually submit your records where you would typically submit your data. This will vary based on the integrator used.
4.    Using the Oracle screen, confirm your scheduled process has completed.
5.    Navigate back to the More4apps Excel Workbook.
6.    Click the ‘Scheduled Processing > Refresh’ button in the Ribbon.
7.    All records that previously had a status of ‘Pending’ will be refreshed.
 
a.   Successful records will change their status to ‘Accepted’.
                      
 
b.   Failed records will have their status changed to ‘Error’ along with an error message.
                       
 
8.    For any errored records, please follow steps 1-7 again.
 
Submitting
Where it is supported by the Integrator, you can launch a pre-defined scheduled process.
 
In the example, the Projects Modules Costs Integrator supports the Import of unprocessed costs. Providing you with all fields you would typically see in the Oracle Cloud user interface.
 
 
Once a process has been submitted it can be viewed in the Oracle Cloud UI.