The Costs Integrator can be used for Adjustments of existing Project Costs. The following Adjustment Types are supported in the tool:
· Reverse
· Set to capitalizable
· Set to noncapitalizable
· Set to billable
· Set to nonbillable
Currently, using the Costs Integrator to carry out Adjustments require that you keep the mandatory columns for Unprocessed Costs on the sheet. These are:
· Expenditure Items Upload Action
· Transaction Reference ID
· Transaction Source
· Document
· Document Entry
· Expenditure Batch
· Business Unit
· Item Date
· Project Number
· Task Number
· Expenditure Type
· Expenditure Organization
· Quantity
· Columns required for Costed Transactions or Columns required for Usages
· Transaction Currency Code
A separate Cost Adjustments Integrator is in development so that the above mandatory columns can be left out when Cost Adjustments are carried out.
Reverse
To reverse existing Project Costs, please follow the instructions below.
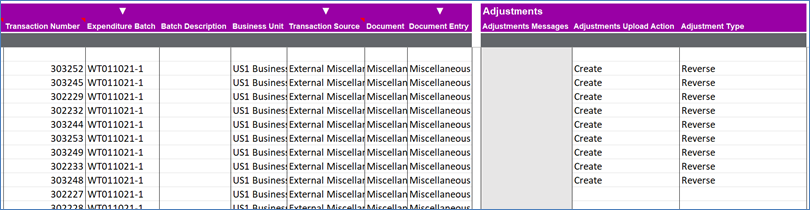
1. Download Processed Project Costs using the Costs Integrator. In the example below, the projects costs are downloaded using the Expenditure Batch name criteria.
2. Once the Project Costs that are to be reversed have been identified, use the Adjustments section to enter Adjustments Upload Action of ‘Create’ and Adjustment Type of ‘Reverse’ on the same line as the Project Cost you want to reverse. Transaction Number must exist for the cost in order for the reversal to work. You may want to delete the columns that are not mandatory.
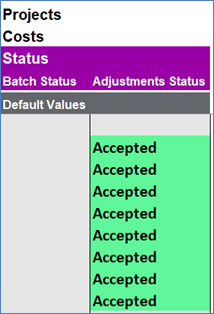
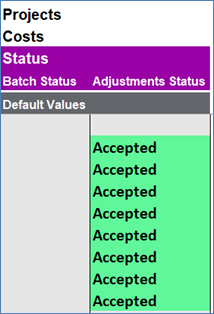
3. Once the reversals have been entered, they can be uploaded to Oracle. More information on how to upload records to Oracle can be found here. Clicking on the ‘Upload’ will trigger the Integrator validation as well as the Oracle REST Web Service validation. Once the reversals pass validation, they will be uploaded to Oracle. See section Error Handling and Validation for more information about validation. A successful upload of reversals will be returned with the status of ‘Accepted’ in the Adjustments Status column.
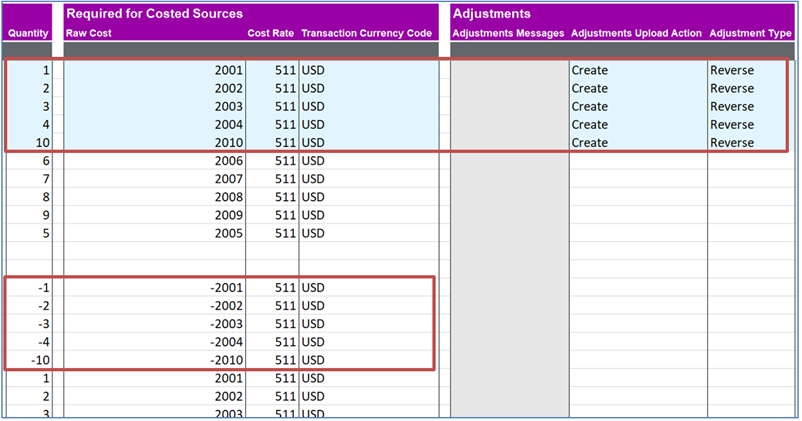
4. You can download the batch again to review the reversing transactions. In the example below, a reversal was created for the five existing project costs in a batch. When the batch is downloaded again on the sheet, five new reversing transactions are downloaded as part of the same batch.
Set to capitalizable
To carry out the Adjustment Type ‘Set to capitalizable’ for existing Project Costs, please follow the instructions below.
1. Download Processed Project Costs using the Costs Integrator. In the example below, the projects costs are downloaded using the Expenditure Batch name criteria.
2. Once the Project Costs that are to be adjusted have been identified, use the Adjustments section to enter Adjustments Upload Action of ‘Create’ and Adjustment Type of ‘Set to capitalizable’ on the same line as the Capitalizable flag you want to change from ‘No’ to ‘Yes’. Transaction Number must exist on the sheet for the cost in order for the adjustment to work. You may want to delete the columns that are not mandatory.
3. Once the Adjustments have been entered, they can be uploaded to Oracle. More information on how to upload records to Oracle can be found here. Clicking on the ‘Upload’ will trigger the Integrator validation as well as the Oracle REST Web Service validation. Once the Adjustments pass validation, they will be uploaded to Oracle. See section Error Handling and Validation for more information about validation. A successful upload of Adjustments will be returned with the status of ‘Accepted’ in the Adjustments Status column.
4. You can download the transactions to review the adjustments done. In the example below, a ‘Set to capitalizable’ Adjustment Type was used to change the Capitalizable flag on existing project costs. When the transactions are downloaded again on the sheet, they show that the Capitalizable flag has been adjusted successfully.
Set to noncapitalizable
To carry out the Adjustment Type ‘Set to noncapitalizable’ for existing Project Costs, please follow the instructions below.
1. Download Processed Project Costs using the Costs Integrator. In the example below, the projects costs are downloaded using the Expenditure Batch name criteria.
2. Once the Project Costs that are to be adjusted have been identified, use the Adjustments section to enter Adjustments Upload Action of ‘Create’ and Adjustment Type of ‘Set to noncapitalizable’ on the same line as the Capitalizable flag you want to change from ‘Yes’ to ‘No’. Transaction Number must exist on the sheet for the cost in order for the adjustment to work. You may want to delete the columns that are not mandatory.
3. Once the Adjustments have been entered, they can be uploaded to Oracle. More information on how to upload records to Oracle can be found here. Clicking on the ‘Upload’ will trigger the Integrator validation as well as the Oracle REST Web Service validation. Once the Adjustments pass validation, they will be uploaded to Oracle. See section Error Handling and Validation for more information about validation. A successful upload of Adjustments will be returned with the status of ‘Accepted’ in the Adjustments Status column.
4. You can download the transactions to review the adjustments done. In the example below, a ‘Set to noncapitalizable’ Adjustment Type was used to change the Capitalizable flag on existing project costs. When the transactions are downloaded again on the sheet, they show that the Capitalizable flag has been adjusted successfully.
Set to billable
1. Download Processed Project Costs using the Costs Integrator. In the example below, the projects costs are downloaded using the Expenditure Batch name criteria.
2. Once the Project Costs that are to be adjusted have been identified, use the Adjustments section to enter Adjustments Upload Action of ‘Create’ and Adjustment Type of ‘Set to billable’ on the same line as the Billable flag you want to change from ‘No’ to ‘Yes’. Transaction Number must exist on the sheet for the cost in order for the adjustment to work. You may want to delete the columns that are not mandatory.
3. Once the Adjustments have been entered, they can be uploaded to Oracle. More information on how to upload records to Oracle can be found here. Clicking on the ‘Upload’ will trigger the Integrator validation as well as the Oracle REST Web Service validation. Once the Adjustments pass validation, they will be uploaded to Oracle. See section Error Handling and Validation for more information about validation. A successful upload of Adjustments will be returned with the status of ‘Accepted’ in the Adjustments Status column.
4. You can download the transactions to review the adjustments done. In the example below, a ‘Set to billable’ Adjustment Type was used to change the Billable flag on existing project costs. When the transactions are downloaded again on the sheet, they show that the Capitalizable flag has been adjusted successfully.
Set to nonbillable
1. Download Processed Project Costs using the Costs Integrator. In the example below, the projects costs are downloaded using the Expenditure Batch name criteria.
2. Once the Project Costs that are to be adjusted have been identified, use the Adjustments section to enter Adjustments Upload Action of ‘Create’ and Adjustment Type of ‘Set to nonbillable’ on the same line as the Billable flag you want to change from ‘Yes’ to ‘No’. Transaction Number must exist on the sheet for the cost in order for the adjustment to work. You may want to delete the columns that are not mandatory.
3. Once the Adjustments have been entered, they can be uploaded to Oracle. More information on how to upload records to Oracle can be found here. Clicking on the ‘Upload’ will trigger the Integrator validation as well as the Oracle REST Web Service validation. Once the Adjustments pass validation, they will be uploaded to Oracle. See section Error Handling and Validation for more information about validation. A successful upload of Adjustments will be returned with the status of ‘Accepted’ in the Adjustments Status column.
4. You can download the transactions to review the adjustments done. In the example below, a ‘Set to nonbillable’ Adjustment Type was used to change the Billable flag on existing project costs. When the transactions are downloaded again on the sheet, they show that the Capitalizable flag has been adjusted successfully.
Sections: